Buttons

Buttons
Showing posts with label easy. Show all posts

January 11, 2014

A new craze - I'm hooked

I know I haven't posted for a while but I've been busy, we've had Christmas etc., so there was lots of family, lots of cooking and lots of DIY and crafty stuff. I've taught both daughter to crochet so REALLY busy.

One of the things I hate most is not doing anything, I have a very round bottom and like to do - a nightmare for me is a 2 week beach holiday. At home sitting down in the evening to relax I can't just do nothing, I plan projects knit or the latest thing is crochet. 

Remember when Granny crochet those horrible ponchos in the 70's and it was really naff and you had to do it in sewing class at school and all you ever finished so some horrible oven cloth or a table runner? Well, times have changed and after avoiding even the word crochet, I can't get enough it. 

On my daily dip into Pinterest I came across amigurumi, very cute small crocheted animals and I mean cute. You just need a few ends of wool and off you go, even if you haven't ever crocheted before all you need are a couple of basic stitches. The video below could be your first effort.


My first was a little teddy, the pattern is here, it took me about 3 hours start to finish.


Then both my daughters thought it was solo cute they HAD to learn to do it. So looked for a first project for them and here it is Mr Murasaki great fun, I now have a family of amigurumi on my desk.


And of course you need the pattern, here

October 08, 2013

Fabric Storage Bin

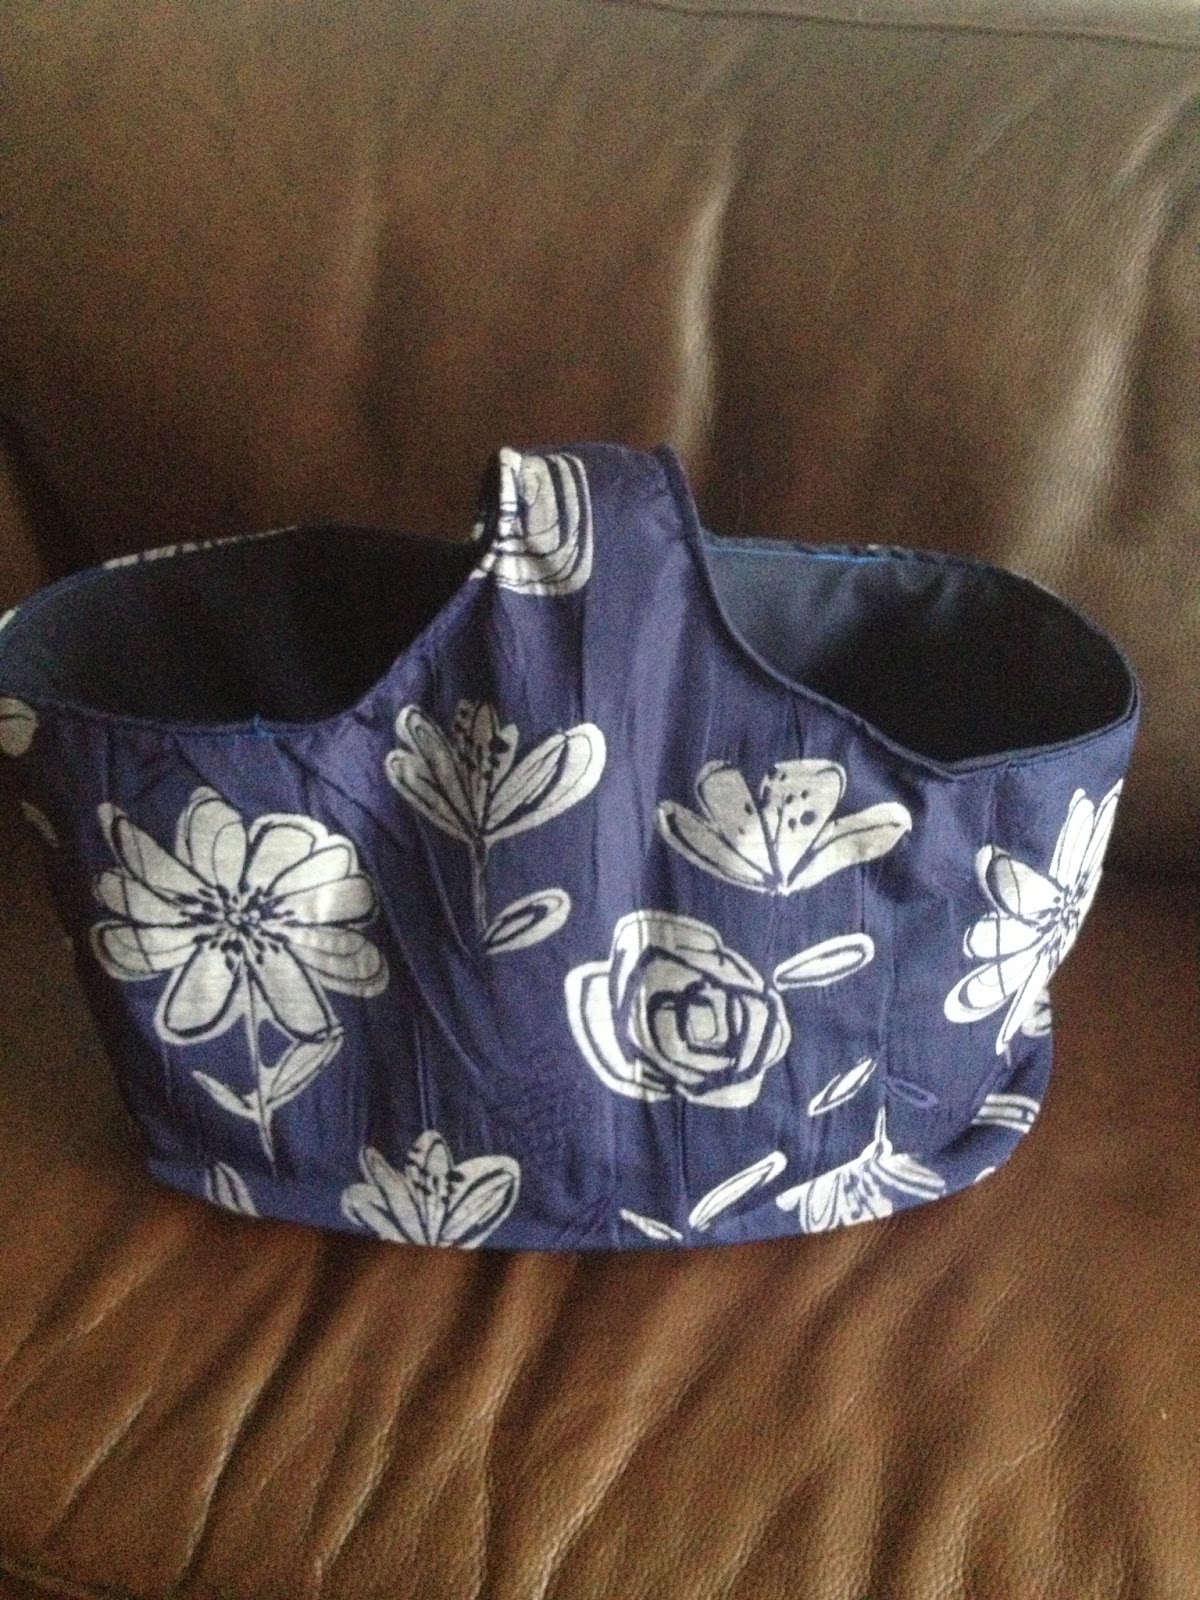
I went to a ladies bric-a-brac sale at the weekend and the stall at the entrance was doing a very brisk trade soI decided to have a look. Basically the were selling fabric Storage Bins of off sizes, I thought they were fun but, expensive. I was sure that they couldn't be that difficult to make and that I had all I needed already and I was right.


This storage bin took about 3 hours to make from working out how to do it and finishing it and was made from scraps and leftover material I already had. It's measures 25cm across, just right for keeping my knitting in - a felted bag which I'll share with you at a later date.

You can make them any size so I'm not going to put the measurements in but how to work out the sizes of the 2 pattern pieces you'll need:

Pattern Pieces

The Base: a circle, measuring Xcm across (in this case 25cm)

The Side: a rectangle: side 1, measuring the desired height including (in this case 30cm) turnover. Side 2, measuring the diameter of the base x 3.14 (25 x 3.14=78.50cm)

Material

Exterior material, cut 1 x base, 1 x the side rectangle
Interior material, cut 1 x base, 1 x the side rectangle
Interfacing, cut 2 of each. - I used a fairly heavy weight interfacing, to help stabilise the sides


Instructions:

Cut out all the pieces and iron on the interfacing on the wrong side of all the pieces. Starting with the exterior material, with right sides facing sew down the side seam and clip back the interfacing. If you don't it might get a bit lumpy and thick.

Carefully pin the base to the tube, again right sides together, you might find it easier to tack (loosely sew) them together before slowly and carefully sewing the pieces. Clip back the interfacing and snip small v's into the edge of the circle being careful not to cut into the stitching.

Repeat with the interior pieces.

No put the 2 pieces inside each other, right sides together, lining up the seams and sew the top of the storage bin together leaving a gap so that you can turn it the right way round.


Don't forget to clip the interfacing back before you turn it the right way round, once you've done that top-stitch the top edge. This also closes the gap in the top seam. Don't be tempted to miss the top-stitching, it really makes a difference to the finish of the whole thing.


Enjoy.


August 21, 2013

Cute knitted Owl Hat

I haven't knitted anything for years, so I thought I'd give it a go again. Here's the result a really cute knitted hat.

Now I must admit it's not my own pattern I found it on Pinterest and loved it. It only took me 2 evening to knit and it was really relaxing chatting and knitting.... knit and bitch...such a good idea.

Anyway here's a link to the pattern, enjoy knitting it, I've certainly re-found a passion :)... Here's a close up of the motive for good measure.


May 10, 2013

Curtain Skirt

I haven't posted for a while so I thought it was time to get posting. My daughter is an avid leader of fashion for her peers and as such can soak up a large amount of time shopping and searching for style on the internet. Having said that once something is in her wardrobe it stays there and is usually combinable  with everything there, one of her favorite pieces at the moment is a picture skirt, it's a good shape fits perfectly and looks good. So as she didn't want to pay for another one, or wait for it to arrive from the States, she asked me to copy it. Link to my daughters blog: BATTAB

In the end the skirt cost me EUR5 to copy!! We found the bottom of some Ikea curtains that I'd taken up and I must admit the result is lovely :).

So here goes:


First thing to do is make a pattern, get a big sheet of paper, I used a newspaper - my favorite go to for pattern drawing, you can buy special paper but why bother. As the skirt fits perfectly and is only 2 panels (back and front) just lay it down and draw round it, adjust any measurements it need be, add 1.5cm all round for the seams and 5 cm for the hem, mark where the zip goes. Now you need to cut a piece for the waist band and interfacing, take the paper pattern lay it on a fresh sheet of paper and make a strip by copying the top 5 to 10cm this will give you an internal waistband.


Cut:

2x skirt panel
1x waistband in skirt fabric (on fold)
1x waistband in interfacing (on fold) without seam allowance


  • Iron the interfacing onto the wrong side of the material waistband.
  • zigzag round the cut out pieces.
  • Lay the 2 panels together, right sides facing.
  • Pin and sew together along the non-zip side.
  • Open the seam and pin the interfacing on to the waist edge of the skirt, - again right side to right side.
  • Sew along the top edge and trim the seam if necessary.
  • Turn in the waistband and iron down.
  • Sew the other seam to where the zip goes.
  • Iron open the seam and carefully iron the rest of the 2 sides over.
  • Pin and then tack (loosely sew) the zip into the skirt.
  • Carefully machine sew the zip in - I find it easiest to adjust the needle to the side and do it slowly - to strengthen it machine over the bottom a couple of times.
  • Turn up and sew the hem and tie the loose ends.


Where I've said iron, it is only a tip - but it does really make it easier. You can do this with any item og clothing!

ENJOY


March 03, 2013

Eco friendly Shopping-Bag

Like a lot of people I don't accepting plastic bags in shops and try and avoid them at all costs, I have dozens of those fold away bags but find them too small especially when I go to local the Saturday morning, so I made this bag. It can be stored flat so it doesn't take up too much space and can be made with spare material or less than a meter of fabric.
First, we need to make a pattern, get an old new paper, take out the middle page leave it folded and draw a line about a third of the way in and and a third of the way down the page and then the cut out for the handle, you can adjust the size to suit yourself, you also need an oval for the bottom, make sure the circumference of the bottom is the same as the bottom edge of the sides of the bag (all the way round).
Once that's done time to cut out the pieces, cut;
  • 2x sides in main fabric
  • 2x sides in lining
  • 2x sides in interfacing (fairly stiff if you have it)
  • 1x bottom in main fabric
  • 1x bottom in lining
  • 1x bottom in cardboard
Now lets put it together:

  • Iron on the interfacing to the main fabric
  • Sew the 2 sides of the outside of the bag together and do the same with the handle.
  • pin and sew in the bottom - I used the lining fabric for the bottom of the outside - your choice.
  • Do the same with the lining.

Now you have 2 'bags'.
  • Cover the cardboard bottom of the bag with cling film. (to stop it getting wet and ruining).
  • Turn the outside of the bag the right way round and put the cardboard in the bottom.
  • Put the lining inside the bag, so now you can't see the seams.
  • Turn in and pin the top of the bag and sew around the edge about half a centimeter from the top edge.
Now you have a strong cotton bag ready to use, to make it a little more durable I sprayed mine with water resistant spray. ENJOY.


January 13, 2013

Cute Pink Candles

One of the things I love doing is going round junk shops to see what I can find, there's always something that can be repurposed, mended or just given a bit of TLC. This morning was no exception I found these two really pretty bone china expresso cups and saucers.

Untitled

Get some composite wax, or bits of old used candles and measure enough to fill the cup, if you're using fresh composite wax add about 10 - 20% extra. You can get it at craft shops or even Amazon together with a pack of wicks shouldn't cost you more than €8,-.

Untitled

Before you start melting the wax prepare the wicks for each cup, I attached them to a disposable chop-stick but, you can use a pencil, knitting needle or anything you have handy.

Untitled

Now melt the wax, the easiest way is to use a saucepan of hot water and a plastic container, I added some orange essence before melting to make it smelly.

Untitled

Once it's melted carefully and quickly pour it into the espresso cups and put the wicks in.

Untitled

Now all you have to do is wait for the wax to harden and you have a couple of very pretty candles. You can turn almost any container into a candle in te same way. Enjoy! :)


Untitled